Fail to prepare, and you risk failing the entire painting project. Uncleaned and rough surfaces are not good for paint adhesion. Prep work does the magic of letting your paint stick to your walls. Simply put, it adds value to your paint job, enhancing aesthetics and longevity.
So, invest from the very beginning! Learn expert tips for preparing your walls for painting and guarantee a professional-looking finish.
Gather Necessary Tools and Materials
Bring in the tools and cleaning supplies! Gather everything that you need to start preparing your walls. This will make your job a lot faster and easier than going back and forth to the store or storage room to access your prep work materials.
Here, we’ve made a list of the essential tools for your surface preparation:
- Cleaning supplies (soap, sponge, bucket)
- Repair tools (filler, filling knife, sandpaper)
- Protective gear (gloves, dust mask)
- Painting supplies (primer, paintbrushes, rollers)

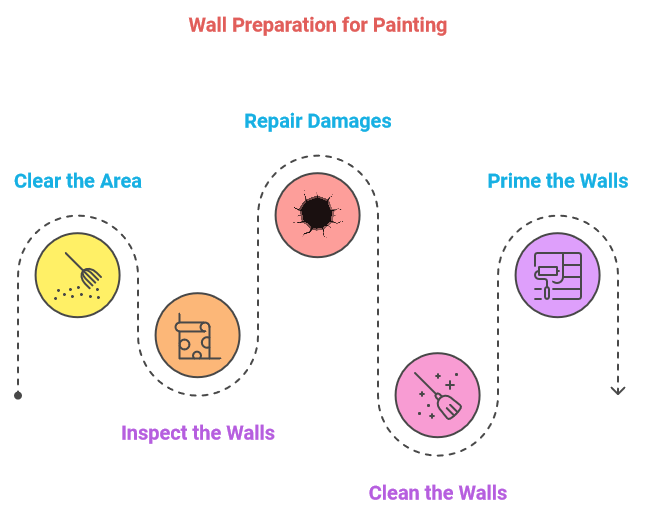
Clear the Area
Got everything you need? Then let’s start clearing the area!
First, remove all fixtures around the expanse. If they’re too heavy to get out of the house, you can cover the furniture (your floor included) with drop cloths. Then, move your stuff towards the centre of the room.
This way, you can see the bones of the area, allowing you to focus on the work at hand.
Inspect the Walls
Did you see any holes, cracks or peeling paint on the walls? Look very carefully for damages. You’ll want to fix them first before painting to make sure the surface is even.
Identifying issues is an important step for any painting project to prevent additional problems. Paint adheres poorly to damaged areas. Therefore, you want to address these imperfections to ensure a durable and good-looking finish.
Repair Damages
Before filling the gaps, you need to clean them first. Remove any particles and loose debris. You can use a vacuum or sugar soap to completely wipe away the dust.
Next, get a filling knife and push the filler carefully into the gap until it’s flat with the wall. Take note, there are appropriate fillers for different wall types, so use the right material.
Once you’ve filled out the cracks, leave to dry. Then smooth down the filler with a sandpaper in a light, consistent pressure. Keep sanding until you’re satisfied, but never let the sandpaper stay in one spot for too long.
For a visually appealing paint job, you want your surface slick and even as possible.
Clean the Walls
Be sure that your walls are spotless before paint application. Paints don’t stick to surfaces coated with dust, grease or any paint residues.
Put on the gloves and take out the sugar soap and mild detergents. Give your walls a nice final swipe to remove any remaining particles, and then leave it to dry thoroughly.
Prime the Walls
You’ve made walls spotless clean; now take out the primers.
Primers are designed to improve paint adhesion while adding protection and providing a clean base for your colours to adhere to.
Priming also seals porous materials on bare drywalls or previously painted surfaces by preventing the excessive absorption of paint that can result in an uneven, patchy finish.
How to Prime Effectively

To apply the primer, use high-quality brush or roller. Always begin from the edges and then slowly work your way up toward the inside.
Simply prime the walls evenly until the surface is smooth and flat. This is a necessary process if you’re using dark paint and if your walls had gaps that were filled out with filler.
And never rush the process; allow drying time for your primer before applying the next coat.
For a smoother finish, we recommend sanding between coats.
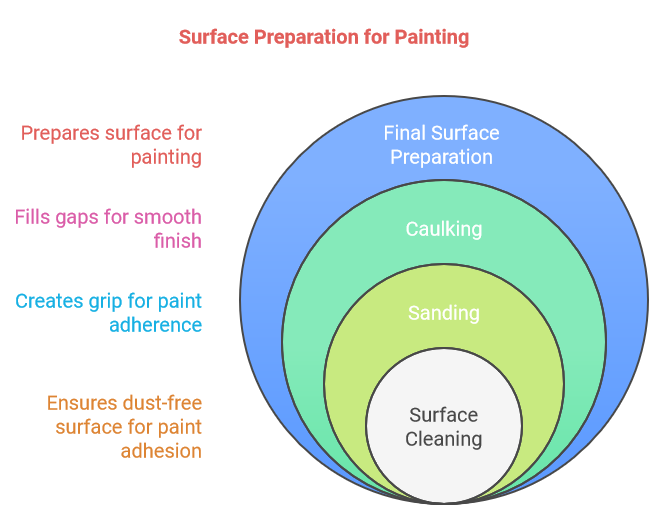
Caulk Gaps and Cracks
Caulking is crucial to achieving a seamless finish. How so? Because through caulking, you can fill in any cracks, gaps or joints on your walls that have become salient over time.
Caulk coated over trims and mouldings is helpful in ensuring a uniform surface for painting. The result? A professional-looking paint job with strong adhesion that can last for many years.
The most common caulking tool is acrylic latex. It’s an all-purpose caulk that can withstand challenging weather conditions—from super dry to lots of water painting areas.
For areas swimming in water, we also recommend using a silicone caulk. It’s super water resistant and is a versatile material that can expand and contract with the changing temperature.
How to Caulk Effectively
Hold the caulking gun and slowly squeeze the trigger. Keep a steady pressure as you apply the caulk in a single, continuous stream in the gap. This is to avoid uneven beads and ensure a professional-looking finish.
Final Surface Preparation
As for the final touches for preparing your walls for painting, sand the entire surface.
Sanding is responsible for creating the “grip” for the coats of paint. It abrasively grooms the surface so the paint can cling better. This is essential, especially when you’re dealing with drywall and surfaces with old paint.
How to Sand Effectively

Pick the right sandpaper. For heavy sanding, use a coarse grip sandpaper. For smoother sanding, use a medium-grit sandpaper.
Then, sand in a circular motion, in a uniform texture. Remember, your sanding strokes still depend on the material you’re working on, so be sure to consider that.
After all the heavy sanding, we recommend doing one final sweep before paint application. Wipe down surfaces to remove dust after sanding. Just make sure that the wall is free of any contaminants that could affect proper paint adhesion.
Conclusion
That concludes our expert tips for preparing your walls for painting. We know it seems like a lot of work—gathering tools, clearing the area, inspecting damages, priming, caulking and cleaning again. However, this is the way to achieve a beautiful finish that others would envy and you could be proud of.
Preparation is the ultimate key, mates!
So, if you want the best painting finish, stay true with this guide. Or you could partner with a professional for a seamless painting project experience.
A One Korean Painting are real painting experts; we know how to elevate your painting job to the next level for an affordable price. It matters because your home isn’t just a place; it’s a feeling bursting in colours.

